Do you want to slide any content in Gutenberg? It may seem crazy, but I am not kidding with you. GutSlider which is called an all-in-one block slider for Gutenberg block editor can easily slide any content you want.
So, let’s explore the complete guidelines on sliding any content in Gutenberg with the GutSlider block plugin.
GutSlider – All in one Block Slider
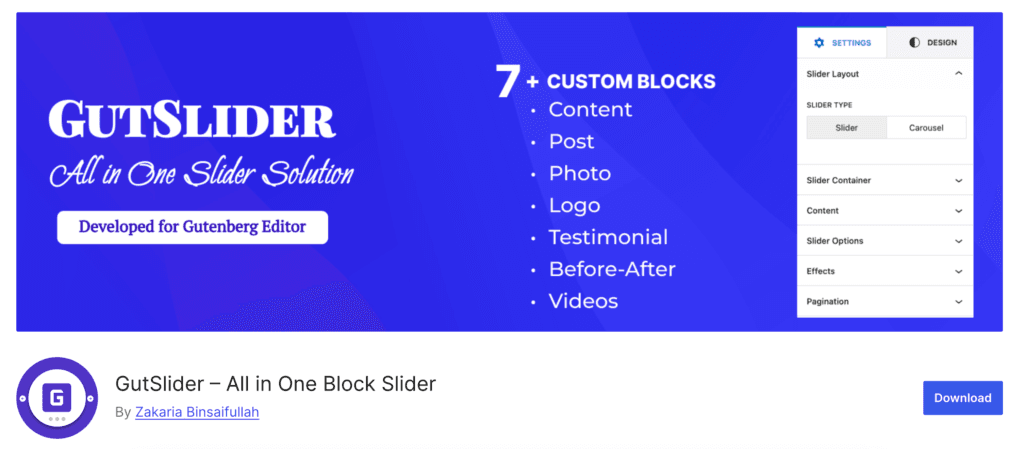
GutSlider is a powerful Gutenberg block plugin offering different sliders and carousels. It even gives you the flexibility to slide any content in Gutenberg using its Flexible block.
In addition, GutSlider comes with a complete set of customization options so that you can customize your slider or carousel as per your needs.
Key features
- Easily add and arrange content within sliders without any coding.
- Ensures that sliders adapt smoothly to different screen sizes and devices.
- Provides reliable, lightweight slider functionality without jQuery dependencies.
- Includes various settings for slide transitions, timing, animations, and styles.
- Supports smooth animations and custom delays for a polished visual experience.
- Scripts only load on pages where the block is used, enhancing site speed.
- Add images, text, videos, or any type of content into the slider.
- Easily control the number of slides, slide navigation, pagination, and more.
- Built natively for the Gutenberg editor for a smooth user experience.
- Minimal resource usage ensures fast load times and performance.
Installation and Activation
Here’s a step-by-step guide on how to install and activate the GutSlider plugin, based on the image you provided:
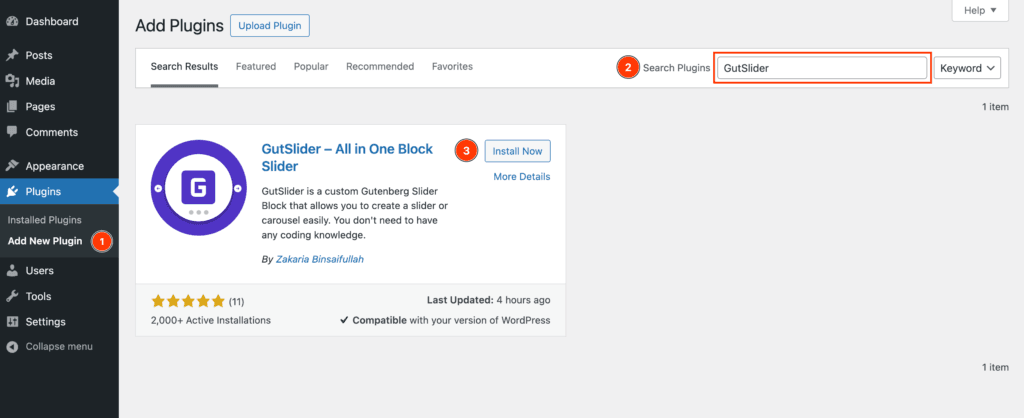
- Log in to your WordPress Admin Panel:
- Go to the Plugins Menu: From the dashboard, hover over or click on the “Plugins” option on the left-side menu.
- Click “Add New“
- Search for GutSlider Plugin: In the plugin search bar at the top right type “GutSlider” to find the plugin.
- Install the Plugin: Once you locate GutSlider – All in One Block Slider, click the “Install Now” button.
- Activate the Plugin: After installation, the button will change to “Activate“. Click on it to activate the plugin.
- Now, the plugin is ready for use, and you can start creating sliders using the Gutenberg editor.
Add the Flexible Block to the Editor
GutSlider comes with multiple sliders and carousel types. Since we are discussing sliding any content in Gutenberg, pick the Flexible block from the GutSlider Blocks list.
Moreover, to create a content slider in Gutenberg with your favorite content type, follow the below steps to proceed:-
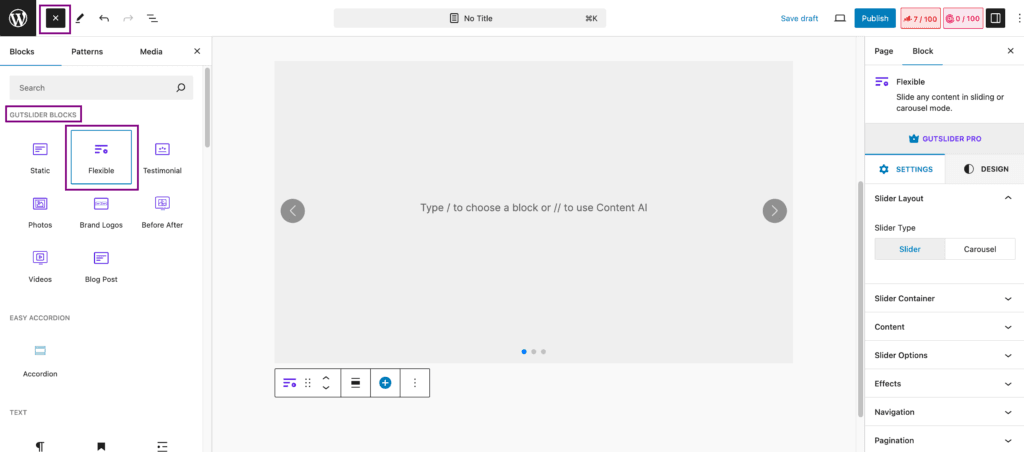
- Open the Gutenberg Editor: Navigate to the page or post where you want to create any content slider.
- Access the Block Menu: In the block menu on the left, scroll to find the GUTSLIDER BLOCKS category.
- Select the Flexible Block. Once you click on the block, instantly it will be added to the editor.
Add Slide Content
Now it is time to add slide content. As you have already described you can add any type of content as the slide content. By default, it doesn’t have any content but it comes with a placeholder paragraph text.
As a result, you can add any blocks available on your whole site. For example, it can be a heading, an image, video, audio, gallery, blog post, etc. So, let’s add some content for this.
You can add a block in different ways. For example:-
With Shortcut
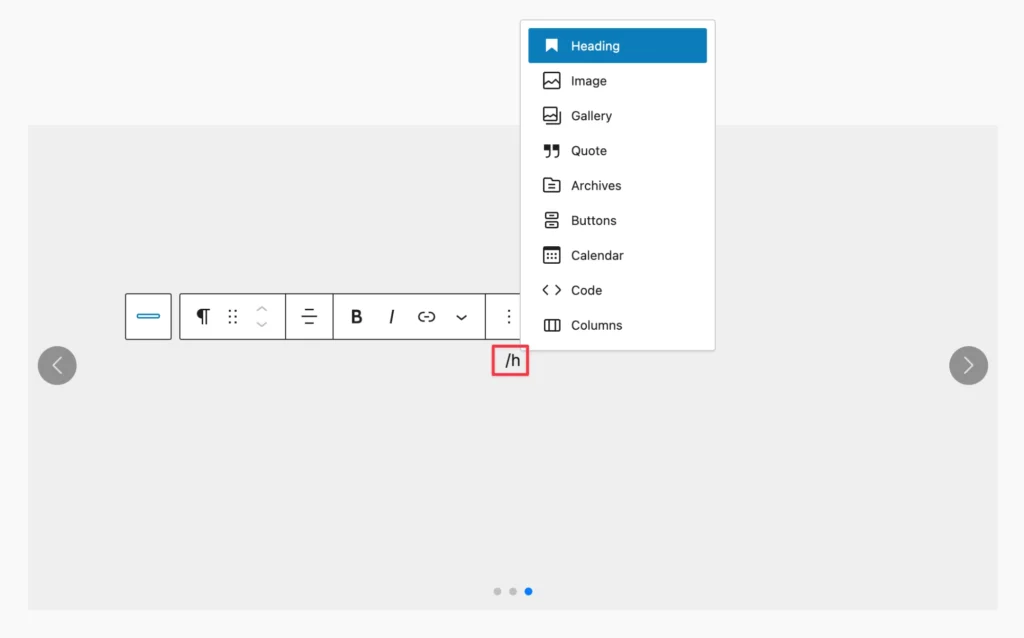
Click on the placeholder paragraph text and type forward-slash (“/”), you will magically see that all other blocks are available to insert inside the slide item. For example, we want to add a heading block, so let’s add /heading. It looks like the following screenshot:-
Drag and Drop
Drag-and-drop system is also available to add blocks as the content slider. First, select the block that you want to insert, now drag the block and drop inside the default placeholder. For example, let’s add a heading block with drag and drop way. It looks like the following screenshot:-
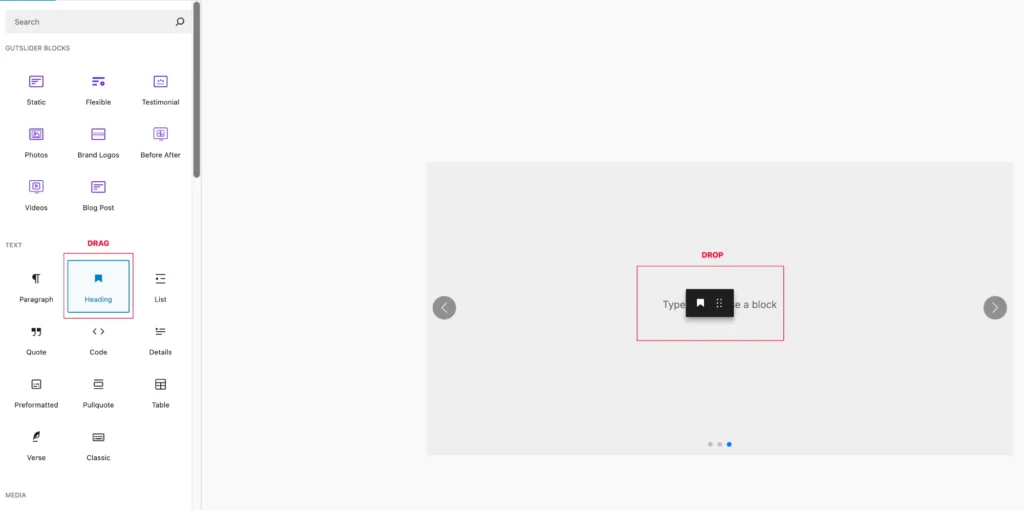
Are you thinking of adding more content? No worries, follow the same way to add more blocks and add different types of content as per your need.
Add New Slide Item
By default, the flexible block has 3 slide items, but no worries, you can either add or remove more slide items. To add a new slide item, you can follow one of the following two steps:-
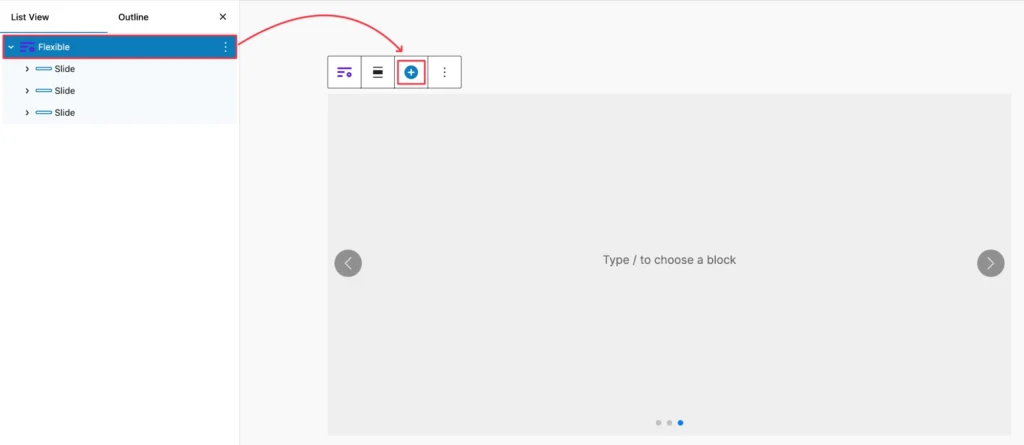
Add Slide Button
You can use the Add Slide toolbar button to add a new slide item. To do that, first, you have to select the parent slider, I mean the flexible slider, and then you will find a Plus Icon (+) button at the top toolbar. Now simply click on the button and instantly it will append a new slide item. The process looks like the following screenshot:-
Duplicate Slide
You can also duplicate any existing slide item to add a new item. To duplicate any existing slide item, first, select the item that you want to duplicate. Then click on the 3 dots to open the actions panel. You can select the block for duplicating using the List View or Toolbar. For example, we want to use the List View to duplicate our first site. It looks like this:-
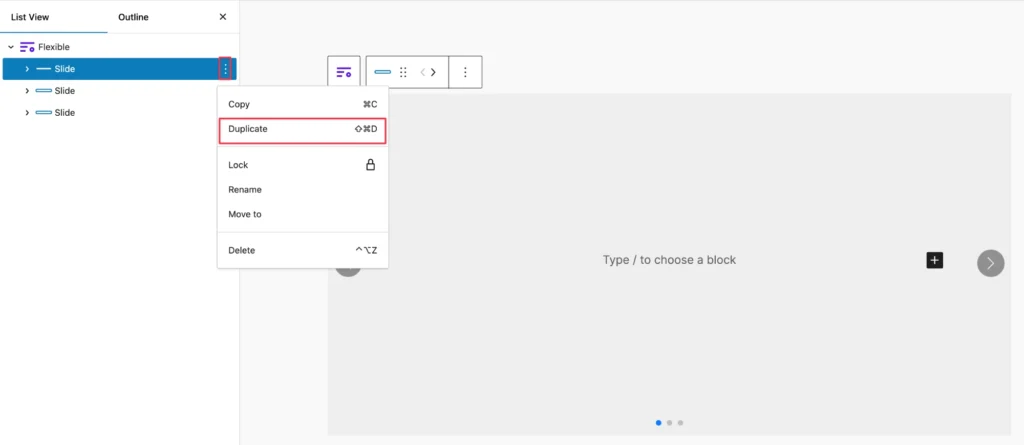
Once the duplication process is done, then simply change the existing content and place your new content.
In addition, you can use the keyboard shortcut to duplicate the existing slide item.
Delete Slide Item
You may need to delete any existing slide item. To delete any existing slide item, you can again either use the List View or Toolbar to select the expected slide item and delete that. For example, let’s select the first slide item from the List View and click on the 3 dots, then you will find the actions panel. Now, click on the delete option to remove the slide item.
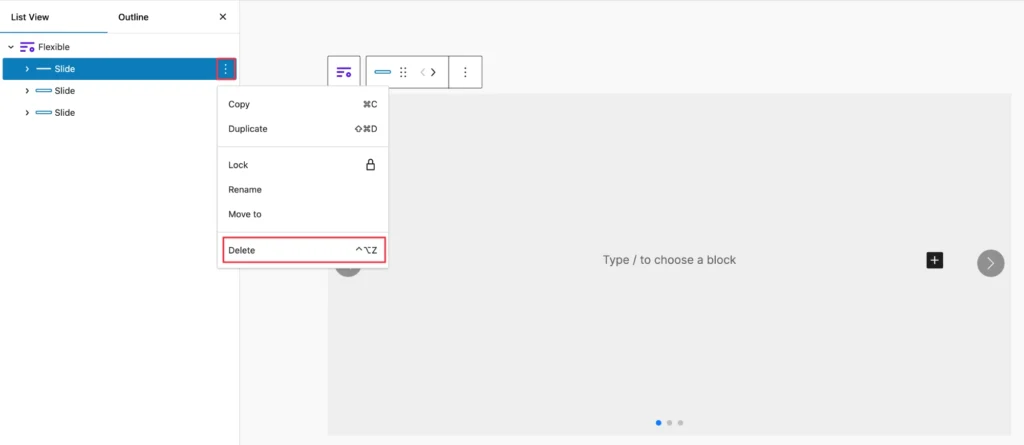
In addition, you can also use the keyboard shortcut to delete any slide item.
Customize Slide Content
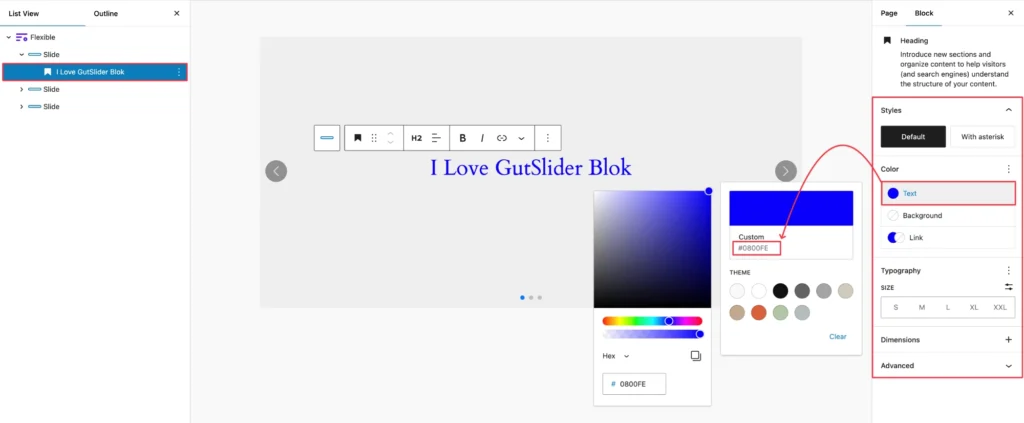
Since the flexible block allows you to add any existing block and any content as you wish, so the content style depends on its corresponding settings. For example, if you want a heading block as the slide content, you have to select the heading block to style the content of the heading.
In the following example, I have added a heading called “I love GutSlider Block”, now I have selected the heading block itself, and on the right side, its corresponding style options are available. For example, change its color to red, then it looks like this:-
Change The Slider Container
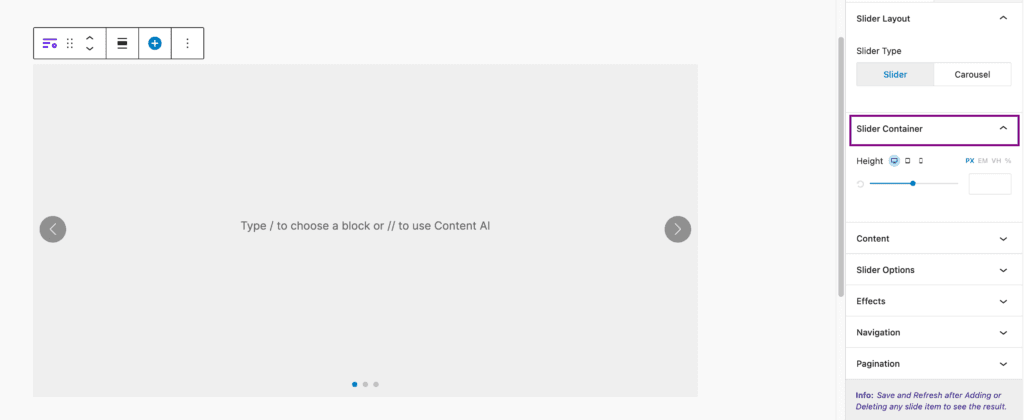
The image shows a user interface for customizing a slider container. Here are the key options and what they do:
- Height: Adjusts the overall height of the slider. You can set it in pixels (PX), ems (EM), viewport height (VH), or percentage (%).
- Padding: Controls the space inside the slider container. You can set padding for the top, right, bottom, and left sides individually. Options are in pixels (PX), ems (EM), or rems (REM).
- Margin: Adjust the space outside the slider container. Just like padding, you can set the margin for the top, right, bottom, and left sides separately, with options in pixels (PX), ems (EM), or rems (REM).
Using these settings, you can fine-tune the alignment and spacing to achieve the exact layout and look you want for your slider.
Slider Content
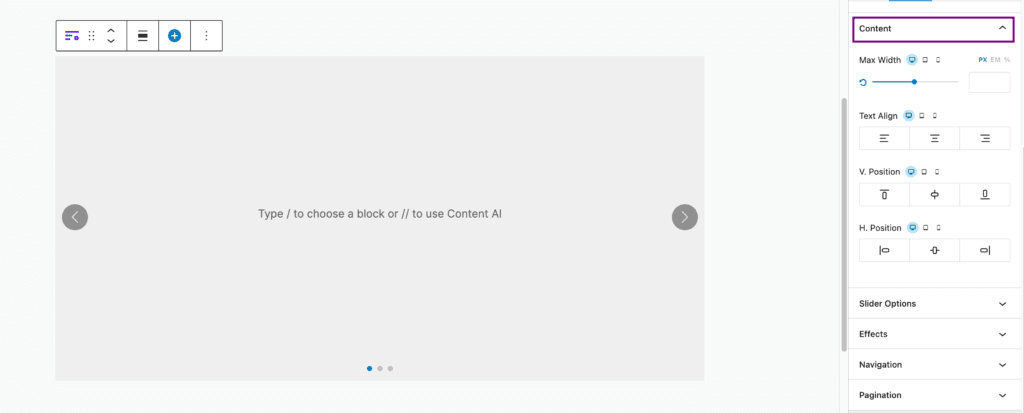
Gutslider Any Content offers two slider layouts: slider and carousel. To create a content slider, ensure you select the slider layout.
- Max Width: Allows you to set the maximum width of your content area using a slider or input field. In the image, it is set to 1092.
- Text Align: Offers buttons to align text to the left, center, or right.
- V. Position: This lets you adjust the vertical position of the content (top, middle, bottom) with button controls.
This enables precise control over the layout and alignment of your content within the slider.
Slider Option
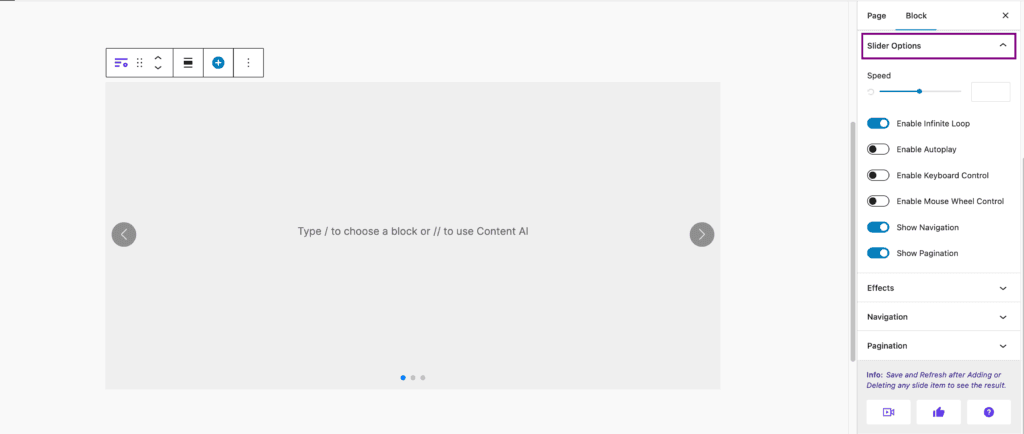
GutSlider offers comprehensive slider options for perfect customization. Here are the options:
- Infinite Loop: Continuously cycles through slides.
- Autoplay: Plays slides automatically without user interaction.
- Keyboard Control: Enables navigation via keyboard keys, enhancing accessibility.
- Mouse Wheel Control: Allows scrolling through slides using the mouse wheel.
- Navigation: Option to show or hide slider navigation.
- Pagination: Option to show or hide pagination, with various pagination types.
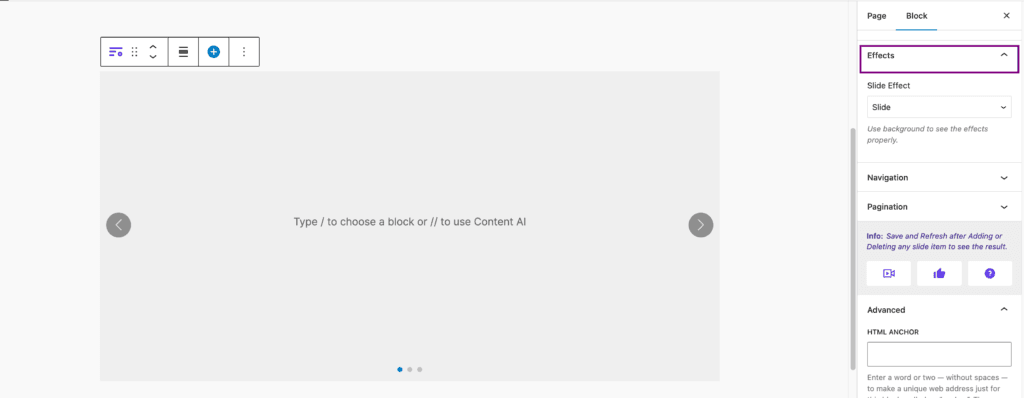
Effects
In Gutenberg, slider effects boost visual storytelling with dynamic transitions:
Here are the tasks for each available slider effect:
- Flip: 3D flip between slides.
- Fade: Smooth opacity transitions for subtle effects.
- Slide: Moves slides horizontally or vertically.
- Cube: Rotates slides like a 3D cube.
- Coverflow: Overlaps and shifts slides for a cover flow animation..
These effects allow you to add unique visual styles and transitions to your slider
Slide Of Navigation
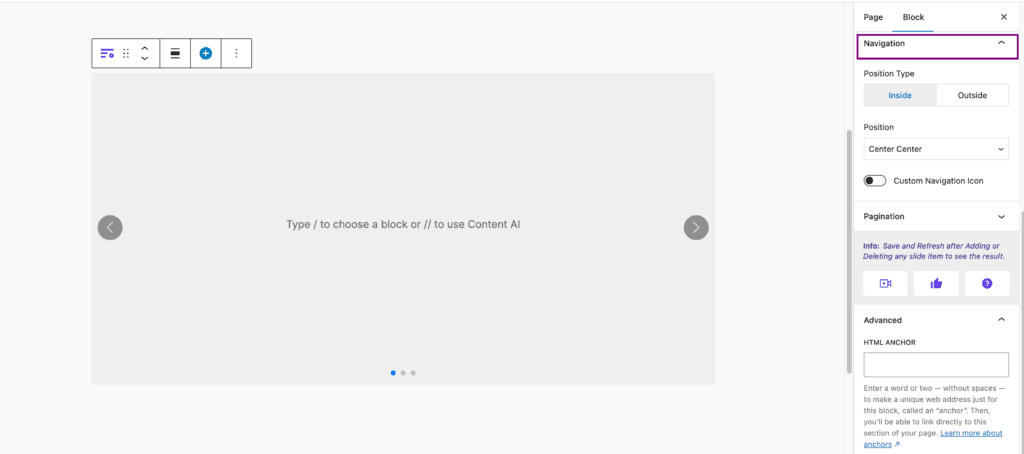
Slide navigation refers to the controls that allow users to move between slides in a slider.
- Position Type (Inside/Outside): Determines the placement of navigation arrows.
- Inside: Arrows are within the main slider area for a seamless look.
- Outside: Arrows are outside the slider’s border to focus on content without overlap.
- Position (Center Center): Dropdown option to set exact positioning of navigation arrows. “Center Center” means arrows are vertically and horizontally centered relative to the slider
- Icon ON: Replaces navigation icons with custom-uploaded icons for a personalized appearance. Icon OFF: Keeps default navigation icons, without any customization.
Pagination
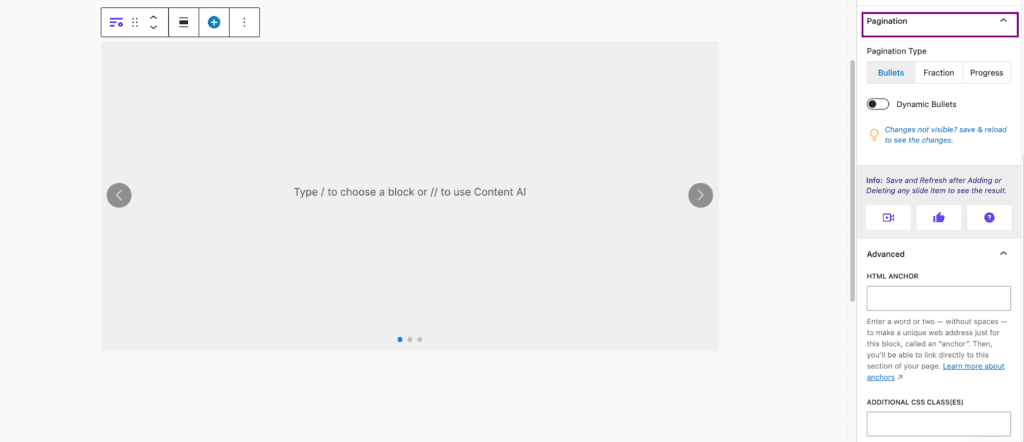
Pagination Type and Dynamic Bullets:
- Bullets: Small dots represent each slide.
- Numbers: Numeric representation of the slides.
- Progress Bar: Fills as you progress through the slides.
- Dynamic Bullets ON: Bullets adjust to show the current slide.
- Dynamic Bullets OFF
These pagination styles enhance the user experience by making it easier to understand where they are in the sequence of slides and to move between them quickly.
Conclusion
I hope you have enjoyed this article on creating a slider in Gutenberg with any type of content. I think the GutSlider is a game-changer for creating an amazing slider and carousel for the Gutenberg editor. If you have any questions, you can comment below.
Original Post Source: https://gutenbergkits.com/create-create-content-slider-in-gutenberg/